Monday, December 27, 2010

It's Beginning to Look A Lot Like Christmas

Yes, I know it is after Christmas. I'm just getting around to posting this. This is a series of cakes that I did in the last Wilton Cake  Decorating class. They were all Christmas cakes.


This top one was after our figure making class. We learned penguins and elves. The tree was so fun to make and so easy. Sculpt fondant out into a cone and use small scissors and snip upward into the cone to make the branches. Make sure that you offset cuts to give the tree texture. You can then pipe decorations on or use more fondant to create decorations.


Here we use the same tree technique. This time I got to have a little more fun creating penguins. The igloo was made with half of the Wilton Sports Ball Pan which I took a toothpick and impressed the design of bricks into the fondant. Then using a #3 tip, I went over the lines, then added lights and an entrance. A paper towel roll work perfect for sculpting the entrance, just lay the fondant over and let dry.

Hope you enjoyed these as much as I enjoyed making them. Happy Baking!

Chocolate Fudge Frosting

Ok I know it has been FOREVER since I posted something on here. New Year's Resolution, keep blog up to date more than 2010. Ok, so here is a recipe that is super easy and  really really good! 

Start by bringing a 1/2 c butter and 1c sugar and 1 tsp vanilla up to boil. Put 9oz of chocolate chips into a bowl and pour boiling butter mixture over chocolates. Stir until mixed thoroughly and no chocolate chunks remain. Refrigerate for 1 hour or  until frosting has set. 
Now you should be able to pipe frosting onto cooled cupcakes.


Hope you like this! Happy Baking :)

Tuesday, October 26, 2010

Sprinkles!

We have a name! It's all starting to get real, now to get the word out. Thank you Kelly Noell for the name, it fits perfect with our vision.

Check out our site: http://www.facebook.com/pages/Wilmington-NC/Sprinkles-Bakery/157141097658799?v=wall

Sunday, October 3, 2010

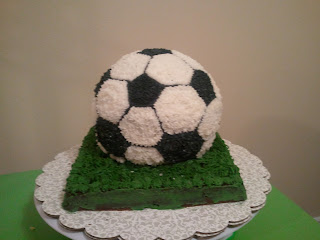
Soccer Ball for a Soccer Star

Isaac's little brother turned 14 Sept 25. To celebrate I made him a soccer ball cake to take for the cookout on his birthday. This was an experience. First time stacking cakes other than my two tiered round cakes.


So this is much harder than I thought it would be.I liked the way it turned out for my first one. I started with filling the molds too full, that didn't leave enough room for icing in the center. The lines were easy to pipe at first, but I started getting confused after the the center row of black pentagons. But overall I like the cake, and so did David, and that's what really counts!

This is how the snow globe would look as well. Hopefully I will be able to stack them better next time so I can make a snow globe for a lucky someone this winter.

More to follow :) Keep checking back for an igloo cake and a Christmas tree cake!

Happy Baking :)

It's Beginning to Look A Lot Like Christmas

For the months of September and October, I'm learning techniques used to make Christmas cakes. So far I've done a stained glass cake (which I saw on Food Network Challenge tonight, and was pretty pumped about it), a candle cake, and a snow globe. Unfortunately I missed the snow globe cake class, but I learned some of the same techniques during the candle class. 

For the Stained Glass cake, we took piping gel traced on wax paper the image on a coloring page. After transferring that to the cake, we outlined it in black buttercream and filled in the spaces with colored piping gel. This cake took FOREVER to complete but it got a lot of compliments at work. The cake I saw on Food Network Challenge, looked awesome with all the detail. I said I wasn't going to try this again, but I think I will if the opportunity arises.

For the candle cake, (which mine is leaning a little) we used three 6in round tiers to get a little more height to the cake.  And yes this actually has a candle in the top, and could be lit, although I'm not sure I would. Pinecones around the bottom of the cake are done on toothpicks, and were actually pretty easy, because hey what two pinecones are exactly alike. There is a pine swag circling the bottom, icicles around the top and cardinals dotting the sides. To tie it all together there are sets of three polkadots randomly put all of the sides and top. Simple and clean is my style and this is definitely my style.

Check back for more updates on cakes! Next blog is on Soccer Ball for a Soccer Star.

Happy Baking!

Friday, September 10, 2010

Peace, Love, and Recycle

This weekend is the Fall Camporee for Person County Girl Scouts. This year's theme is Peace, Love, and Recycle. So I decided to go with a banana cupcake and a peanut butter butter cream. They turned out SO good! I finally got the right amount of banana in the batter. It took three whole bananas but they are really good.


Peanut Butter Buttercream:

1c creamy peanut butter
3/4c powdered sugar
12tsp water
1 Tbsp Meringue Powder

Monday, September 6, 2010

Garden Party Cake

So its' not done in the picture, it was never done before it was eaten. But that is beside the point. This cake was inspired by a garden theme. I made little bumble bees for my Katie Bee, and had many flowers to play around with. Honestly I think it was because I had new toys to play with that week.


Ok so, Fondant to cover since it was a MESS when I iced it. Then fondant and gum paste flowers and bees.

Monday, August 16, 2010

Hersey Bar Cake aka The Best Cake in the World

This weekend Isaac wanted to get a taste of baking and decorating. We didn't get to do much decorating because of the cake we chose but it was still worth it. At least for me.


You can use:
1 box of any Chocolate cake. (German, Devil's Food, Swiss, etc)
1 box instant vanilla pudding (just the powder, DON'T make the pudding)
1 1/2 c Milk
2/3 c oil
3 eggs

Bake at 350 until done. About 30 minutes. One of mine took longer than the other by about 5 minutes. Not really sure what was going on but it ended up turning out fine.

For the icing:
8oz cream cheese
1 c powdered sugar
1 c regular sugar
12 oz Cool Whip (NOT lite)
6 crushed Hersey Bars

I tried this with Lite Cool Whip, not to make it healthier, there is no way to make this healthier! But because it was the only kind. Mix together both sugars and the cream cheese. Fold in the Cool Whip and Chocolate. Let this sit in the refrigerator until the cakes cool and you want to ice them.

Finally the cake is better once iced if you let it sit in the fridge for a night.

Happy Baking!

Sunday, August 15, 2010

Baker's Secret

Here's a tip for all the bakers out there. Ever have a cake or loaf of bread stick the pan no matter how much you spray it? Well no more. Here is a simple recipe that will save your baked goods from now on.

1c Criso or other shortening
1/2 c oil
1/2 c flour

Blend all together. Now this doesn't look very appetizing at all, but there is no taste at all. To apply it in your pans, I use a ziploc bag. Just use the bag as a glove and smear Baker's Secret all over the pan, bottom and sides. Another way to spread is by using a pastry brush. I'm not a huge fan of the silicone brushes. They don't pick up much at a time.

Will keep refrigerated FOREVER! But you won't need it forever. This is likely to become one of your favorite kitchen tricks.

Happy Cooking!

Wednesday, August 11, 2010

A Gift Just For You!

This week I tackled covering a cake with fondant and making a big fat bow for the top. Covering the cake was as bad as I thought it was going to be.  (I do know that I will be buying a bigger rolling pin before I do another one though.) I learned though that a square cake is easier to cover than a round cake. So I guess I will be doing only square cakes in fondant. The bow gave me a little more trouble. My fondant was a little too thick, and I wasn't able to work fast enough. You need to really work fast with this stuff or it will start to crack and tear. My bow started to crack at one of the seams. So the group setting wasn't all that great for me tonight, but Isaac and I will be attempting another one this weekend, so we'll see if that does any better.


This cake did give me another idea. The blue, even though it looks Carolina blue, it is actually more of a Tiffany Blue. So maybe I'll do a blue cake and put a big white bow on it and fix up a Tiffany bracelet to drape over the box. I'll let you know how that one goes too.

Happy Cooking!

Tuesday, August 10, 2010

Banana Cake :)

Well this weekend I spent some time working with fondant. Did I keep anything, no. I was going to, the the ants attacked.

So needless to say, all the fondant is in the dumpster now. But before the attack I started working on a ladybug and bumble bees. Here is the lady bug.


So some of the things I learned. Food coloring is not good for painting! It took forever to dry and was still tacky even when the color didn't bleed onto my finger. Second, use fondant to make the dots and face. It looks pretty good in the picture but not so good in person. I took a carving tool and poked a hole then filled it with food coloring. It looked super cute before the paint, but once it got painted, I think small fondant balls would have been better.

So, on to the really important business. We all know the cake is the star. I tried out the modified banana recipe after my first one failed miserably. This one turned out not so bad! It hasn't fallen apart and I trimmed off the top of one so it would stack flat and it was pretty good. Very subtle banana flavor, so I'll try adding another banana next time.

Even better, the banana takes out A LOT of the fat! So yummy and better for you :) Happy Cooking!

Wednesday, August 4, 2010

Fondant Flowers

So once again I was proven wrong with my first thoughts about this material. I had said in a previous blog that I thought the flowers looked too cartoon for me. Well I guess I'm wrong. They look more realistic than I first thought.


Tonight we worked on daisies, waterlilies, calla lilies and mums. I really like the color scheme and hopefully will do a cake with this soon. I've wanted to do one for a little while, so maybe sometime in this class.


The daisies I think are super cute and so easy! They are cookie cutters :) The water lilies are made the same way with just an extra layer on top.
The mum is actually made with the same form, but there are six layers to make the mum. (the spikey ball looking figure in the top picture.)


And finally Calla Lilies. Simple "cigars" sprinkled in crystal sprinkles and then hearts painted with luster dust, these are green, but you could use any color.

So again I was proved wrong. I know this wasn't that long but there wasn't a cake to talk about. Look for  next weeks blog, Birthday Present Cake!

Happy Cooking!

Friday, July 30, 2010

First Order!

Tuesday I got my first order for a cake. I think this is a big moment for me so that maybe someday I will be able to have a side job decorating cakes. So for the few of you that read this, yes I am selling cakes and taking more orders.

Here is the first cake. And yes it's similar to the other basket one, but thats what they saw and wanted another one like it.


I'm pretty happy with the way it turned out and really proud of it since it is the first one I did completely on my own away from my instructor. 

Happy Cooking!

Wednesday, July 28, 2010

Flowers Galore!

The month of July was all about flowers. Over the month hopefully I have learned new skills and mastered some technique. I'll let you be the judge of that. We started off our first night with the flowers from fondant and from royal icing. Here's the picture from last week that wouldn't load.

And before anyone starts, yes that is a shirt box that the flowers are in. It has been making a few appearances lately. Anyways, the small purple flowers are violets, the yellow are daffodil, and then there are daisies in the upper left corner. I love the look of these so much more than the fondant in the upper right corner. But next month we are working on flowers that will be out of fondant and gum paste which look more realistic. 

After our task the first night, we made a cake with the purple violets. Here is the cake we made during the second week.


There is piping work on the side of cake that I was hoping would look more like a vine, but it turned out good. I'm really looking forward to someday making a cake that I can do lace detail work on. Piping is a tough workout on your hand though. The side of my hand was cramping so bad by the end, and it was a small cake! This on I think was my second favorite to date.

I'm not sure if my finale cake tops this one or not. I'll let you decide that. My last cake is more bold I think and the flowers are more extravagant. I mean nothing like Ace of Cakes extravagant but for me, the beginner! Here is my Grande Finale piece for the second class.


This cake in a basket weave with rope borders, topped with roses, primroses, and a flower that I forget the name. Really I was just trying to get rid of the last bit of icing :) Notice the little violets from the last cake. I had a few left over and they were the perfect final touch my cake needed.

And I'm so excited, I got my first order for a birthday cake this week. I'm finishing that up tomorrow, so I'll be posting tomorrow night with the finished product. A dozen reddish, pinkish roses :) And I'm proud of those roses! Can't wait to see how it turns out!

Happy Cooking! 

Wednesday, July 21, 2010

Royal Icing, Friend or Foe?

Well I always thought that royal icing would be hard to work with, hard to make, and well an all around pain in the butt. I was proved wrong last week when I started working with royal icing flowers.

This week we started working on royal icing and fondant flowers. The fondant flowers, ehh... They were cute in that cartoon style way. Maybe when I learn a little more about it and try some new flowers I'll feel differently.

So here is the recipe for royal icing. Now get ready, it's a doozy. Have pen and paper? Ok.

3 c. powdered sugar
3 tsp meringue powder
2 Tbsp os water

Ok, just kidding, not so hard. The next part is actually tough unless you are lucky enough to own a stand mixer. For those less fortunate like myself, we're set for 7-10 minutes with the hand mixer. I guess there is one advantage. Pretty sweet bi-tricep muscles at the end of this.

On to the fun stuff, flowers! We worked on violets and daffodils this week. The picture failed to upload so you'll have to check back later for the finished cake that used the flowers.


Happy Cooking!

Thursday, June 24, 2010

Roses all Around

This week was the time to tackle roses. Ha! This week was more like the week that we barely finished our cakes because we trashed the first fifty flowers. I figured roses would be hard, but not as hard as they actually were. Oh and the way they teach now....NOT easier. Well before I go on, here is the final picture of Wilton Level 1.

Ok, now I'm not sure what you think about the photo, the detail didn't come out all that well. But I learned something else this week; lack of AC is not conducive to beautiful roses. I did have some nice looking roses, but they sat too long off the cake and when I attempted to move them on to the cake they ended up looking like, well a deformed eye with many many layers. I'll attempt pictures throughout the classes in the future for further enjoyment.

So next week we have a break, but then comes the flowers, lots and lots of flowers! I'll be sure to post a bunch of pictures of the different types of flowers.

So until then, Happy Cooking!

Orders will be taken on a first come, first serve basis :) Haha!

Thursday, June 17, 2010

Thank You Nursing Assistants

So this past week was National CNA Appreciation Week and to end off the very rough week at work we decided that a Pig Pickin' may brighten some spirits, if today didn't help with that at all :)

Well I decided I wanted a little more practice with my newly learned skills and bought an iced sheet cake to decorate. I've decided that I don't particularly like sheet cakes. Too much white space to cover. So it's not as bold as some of the others, and is by no means my favorite cake, but here it is. My small thank you to all the CNAs out there who do the job I would hate to do everyday.

Wednesday, June 16, 2010

Half Way There!

Well this week cake decorating had its ups and downs. 1. The icing was so much easier to do this time 2. The cake looked so much better when I iced it this time. No help needed from the instructor. Downside, I had two 11 days before the class. I was running late and a little too stressed out for it to be as fun. You be the judge though on the cake. I think it turned out great for the week I've been having, but it's not my favorite. Not my first. Well next week is the grand finale cake and I'm really excited about that and roses. Hopefully next week I won't work a full 11 hours before class and have to run to car :)

Well here ya go,


This week was a fish cake. We were learning how to do puffy style designs. Last week it was dainty and exact and this week it  was all about big puffy forms. Still need some work though. My perfectionism is popping out at all the wrong times. :)

Happy Cooking! Check back next Wednesday to see the final installment of Buttercream Frosting.

Wednesday, June 9, 2010

The First One!

You know the first one might always be my favorite, but we'll see next week when I get to decorate the second one. All I know now is that I am addicted and I want to decorate everything in sight! My whoops from the other day with the butter flavored Crisco, turned out to be a very good thing! My pale yellow cake was topped with light purple drop flowers and pale green leaves of two varieties.


And no, the spoon is not what I promptly ate the cake with. The one bad thing about cake decorating, what am I going to do with all the cake???

Happy Cooking! Check back next week for more photos :)

Monday, June 7, 2010

Buttercream Icing

So I had a new experience today, well two. It started out right, but in the end it turned out to be a delicious mess. I had my first attempt at Buttercream Icing today, that wasn't the disaster (which I was sure it was going to be). So do not fear the buttercream, it is much easier to make than imagined :) Note to self though, DO NOT use butter flavored Crisco unless you want yellow icing! Now it is a great shade of yellow and I will be making it work! This week and next; maybe I shouldn't buy items on sale. I get excited about the sale and forget to look closely at the label.


Anyways, here is the recipe:

1 c Crisco, make sure you use Crisco not off brands
4 Tbsp water
2 tsp extract, your favorite kind (I used Lemon tonight to match the yellow Crisco, and it turned out great)
3 Tbsp Meringue Powder
1lb Confectioner's sugar, or 4 c

Blend all ingredients until smooth enough to ice but not as smooth as store bought icing. The spatula should slowly fall when stood up in icing. This was the only tricky part. If too stiff add water, if too loose add sugar. It's an experiment each day. I had to use less sugar and more water tonight.

So I'm taking a series of cake decorating courses over the summer and I'll be sure to post pictures with other types, tricks, and stories! Happy Cooking, or in this case Baking!
Saturday, May 8, 2010

Chocolate Baklava

Now I don't usually like Baklava, but I love this recipe. Lots of nuts and Nutella!

Ingredients:

3/4 c honey
1/2 c water
1 cinnamon stick
1 c Nutella
1/2 c toasted hazelnuts, chopped
1/2 c roasted pistachios, chopped
1/3 c blanched toasted almonds, sliced
1/2 c toasted walnuts, chopped
1/2 tsp ground cinnamon
1/8 tsp salt
cooking spray
24 (14x9 inch) sheets frozen phyllo dough, thawed
1/2 c unsalted butter, melted

Combine first three ingredients in a medium saucepan over low heat; stir until honey dissolves. Increase heat to medium;cook, without stirring, until candy thermometer registers 230 (about ten minutes). Remove from heat; keep warm. Discard cinnamon stick.

Preheat oven to 350.

Place Nutella in a microwave safe container, heat for 30 seconds or until melted. Combine hazelnuts and next five ingredients. Lightly coat a 13x9 cooking dish with cooking spray. Working phyllo dough 1 sheet at a time (cover remaining sheets with damp towel to prevent drying) Take one piece of phyllo dough and lay it in your 9x13 pan. Don't worry if the ends lay up the sides. Brush some of the butter on top and continue with phyllo dough and butter for 5 layers. Take a 1/3 of Nutella and spread it over the phyllo dough and then 1/3 (about 1/2 c) of the nut mixture and sprinkle evenly over Nutella. Repeat process twice and top with the remaining 6 phyllo dough sheets.

Bake at 350 for 35 minutes. Top with honey mixture and let it cool on a wire rack. Cover and store at room temperature.

I fixed this Thursday night with my Mom and it was pretty easy and turned out so good! Don't be afraid to use the phyllo dough, who will know if it tears anyways. It will still taste just as good. Happy Cooking!
Saturday, May 1, 2010

Roasted Asparagus

Here is a super simple one! But so good during the summer, or really anytime you can find good asparagus. I prefer the smaller stalks but it can be done with your choice.


Take asparagus and snap each at the natural point. (hold at each end and bend. The stalk will snap at it's natural point.) Or a TIP leave the bands on both ends and slice the stalks all at once. In a jelly roll pan drizzle olive oil over stalks. Add salt and pepper and bake at 300 until stalks are bright green or ends turn crispy.

Hope this is on your next Heathy Cooking menu! Happy Cooking!

Wednesday, April 28, 2010

Chicken Enchiladas


This is a wonderful recipe from a wonderful friend, Katie. She introduced this to me so long ago at the beach. Just thinking about this makes me want to go back there and spend another wonderful summer.


  • 10 Flour tortillas
  • 2 cups grated cheese (Mexican or cheddar)
  • 2 sm. cans or 1 lg. can of chicken, drained
  • 1 can refried beans
  • 1 bottle of salsa
  • 1 can cream of chicken soup (if it is Campbell’s soup save the label for me.)
  • 1 pint of sour cream (real do not substitute low fat or fat-free)


In a skillet mix the chicken, salsa and refried beans.  Warm and mix completely.  In a small bowl mix sour cream and cream of chicken soup.  Spread a small amount of soup mixture in the bottom of a 9 x 10 baking dish. Fill tortillas with chicken and bean mixture; place seam side down in baking dish.  Top with remaining soup and sour cream mixture.  Cover with cheese.  Bake at 350° for 30 minutes. 

Serve with Spanish rice and chips.

It's not one of the healthier recipes that I have, but it is so good on one of those splurge days. Happy Cooking!

Monday, April 26, 2010

Chile's Southwestern Salad

My Aunt had this when I was there over the weekend. She says that it is like Chile's Southwestern Salad. I don't know if it is or not, I just know that it is good.

Start with your lettuce of choice, mine is Romaine. Drain and rinse a can of black beans and corn. Chop some onion if you like it, I prefer to leave it out. Add these to the salad and mix well. Top with Balsamic Vinegar Dressing and Ranch, equal parts. Mix until dressings are combined and enjoy!

Happy Cooking!

Thursday, April 15, 2010

Death by Chocolate

I've been on a dessert kick lately with my posts, but you know sometimes that isn't a bad thing. Here is one more before I try and find something that isn't on the sweet side. :) Try being key word.

If you know anything about Celebrating Home, you know they have the most wonderful pottery. Each piece of their pottery can be used for cooking, including the bowls. Just take and mix:

  •  a box of Chocolate Cake Mix
  • 1/2 c water
  • 1/2 c chocolate chips
  • 1 can of pumpkin
Make sure to use plain pumpkin, not pumpkin pie filling. Mix all of these in the larger bowl of the two serving bowls and microwave for 13-14 minutes. That simple.

The bowls look much smaller here than they really are. Looks can be very deceiving. :)
Here is the link for those that may want to look into Celebrating Home. www.celebratinghome.com

Happy Cooking!


Monday, April 12, 2010

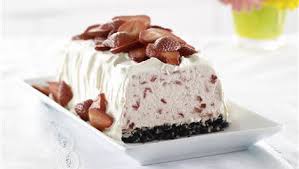
Strawberry Whipped Sensation

Another wonderful recipe from Isaac's family. We had this for his sister's birthday last August. This would be a perfect summer dessert because it's light.


4 cups fresh strawberries, divided
1 can (14 oz) Eagle Brand Sweetened Condensed Milk (I used the green label – it was either Fat Free or Low Fat)
¼ cup lemon juice
1 tub (8 oz) Cool Whip Whipped Topping, thawed, divided (I used lite)
8 oreo Chocolate Sandwich Cookies, finely chopped (I used 12-regular, not double stuff)
1 Tbsp butter, melted

Line a 8x4-inch loaf pan with foil. Mash (or chop) 2 cups of strawberries in large bowl. Stir in condensed milk, juice and 2 cups of the Cool Whip; pour into pan. Top with combined cookies & butter; press into mixture. Cover. Freeze at least 6 hours. To serve, invert onto plate. Remove foil. Frost with remaining Cool Whip. Top with remaining strawberries, sliced.

Makes 12 servings.
Prep time: 20 minutes plus freezing


I hope this is on your next summer get together's menu :) Happy Cooking!

Wednesday, April 7, 2010

To Die for Heath Bar Cake

According to Isaac, calories don't count when we go to his Mom's house. I was very glad this weekend when she made this...

This wonderful creation is the Heath Bar Cake of goodness. All you need to make this is either Devil's Food or Chocolate Fudge Cake Mix, 1 can of evaporate milk, caramel ice cream topping, Cool Whip, and Heath Bar.

Bake the cake according to the box, while warm poke holes in the top and pour evaporated milk on top of cake. Once cooled, poor on caramel and top with Cool Whip and Heath Bar. The longer it sits in the refrigerator the better. Let the cake sit at least 24 hours, even more would make the flavor combine further.

This one is a wonderful edition to your cook book! Hope you like it as much as I do. Happy Cooking!

Saturday, March 20, 2010

Tortellini with Peas and Pancetta

I saw this in the Food Network Magazine and thought it looked so good I had to try it. I experimented with Isaac last night and it was so good. Light but filling.


Ingredients

  • Kosher salt
  • 1 pound meat-filled tortellini
  • 2 tablespoons extra-virgin olive oil
  • 4 ounces prosciutto or pancetta, finely chopped
  • 3 cloves garlic, thinly sliced
  • 1 tablespoon tomato paste
  • 1/4 cup heavy cream
  • 1 cup frozen peas, thawed
  • 2 tablespoons chopped fresh parsley
  • 1/2 cup grated parmesan cheese

Directions

Bring a large pot of salted water to a boil. Add the tortellini and cook as the label directs.
Meanwhile, heat a large skillet over medium heat. Add the olive oil and prosciutto and cook until crisp, 3 to 4 minutes. Stir in the garlic and tomato paste and cook until fragrant, about 1 minute. Ladle in about 1 cup of the pasta cooking water and simmer until reduced by about half, 3 to 4 minutes. Add the cream and simmer until slightly thickened, 2 to 3 minutes.
About 2 minutes before the tortellini are done, add the peas to the boiling water and cook until just tender. Drain the tortellini and peas and add to the skillet, tossing to coat with the sauce. Stir in the parsley. Sprinkle with the parmesan cheese.
Per serving: Calories 475; Fat 27 g (Saturated 10 g); Cholesterol 195 mg; Sodium 1,237 mg; Carbohydrate 28 g; Fiber 3 g; Protein 29 g

This was such a good a dish! You should try it in the near future. Happy Cooking!

Monday, March 15, 2010

Lemon Filled Angel Food Cupcakes Update!

So, I fixed these today and I must say they turned out pretty good. I think I just like regular cake instead of angel food, but the angel food are very light and it is so easy to pipe the lemon curd into them! This is a must try whether or not you use lemon curd of some other filling.

Happy Cooking or Baking in this case!

Sunday, March 14, 2010

Lemon Filled Angel Food Cupcakes

This on should be super simple, I'm trying this one this week, so I'll let you know how it was on Tuesday. Amanda is having a Celebrating Home party and I wanted an excuse to bake. All I use is a box angel food cake mix. Mix and bake according to box. Once the cupcakes are baked, use a long piping tip, fill disposable piping bag with lemon curd. Pipe a small amount of lemon curd inside each of the cupcakes and let cool. You can ice the cupcakes how ever you want, with just a dot on top to cover the puncture hole or decorate with a flower, which I think I may do. :) It is spring after all!


Good Luck and Happy Cooking!

Friday, March 12, 2010

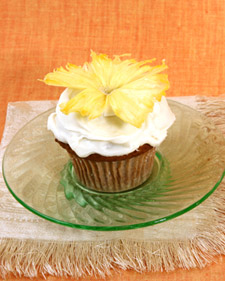
Spring is Here!

I haven't tried this one yet, although I think I will very soon!

Ingredients:

  • 3 c all purpose flour
  • 1 tsp baking soda
  • 1 tsp cinnamon
  • 1/2 tsp salt
  • 2 sticks unsalted butter, melted and cooled
  • 2 tsp vanilla extract
  • 2 c sugar
  • 3 large eggs
  • 2 c mashed ripe banana
  • 1 can crushed pineapple, drained
  • 1 c chopped walnuts or pecans
  • 1 c sweet desiccated coconut 
  • 1 can Cream Cheese icing
  • OPTIONAL: dried pineapple flower
Preheat oven to 350. Line cupcake pan with paper liners, I think I will use cute spring colors. :) In medium bowl, whisk cinnamon, flour, baking soda, and salt. 
In the bowl of an electric mixer fitted with the paddle attachment, beat butter, vanilla, and sugar until combined, about 2 minutes. Add eggs one at a time, incorporating each before adding the next. Beat at medium speed until mixture is pale yellow and fluffy, about 3 minutes.
In a medium bowl, stir together banana, pineapple, walnuts, and coconut. Add to egg mixture, mixing until combined. Stir in flour mixture.
Divide batter evenly among liners, filling about 2/3 full. Bake, rotating pans halfway through, until golden brown and a cake tester inserted in the center comes out clean, 25 to 28 minutes.
Transfer to a wire rack to cool completely. Once cupcakes have cooled, use a small offset spatula to frost tops of each cupcake. Decorate with dried pineapple flowers, if desired.

Hope you enjoy, I'll post again after I these out! Feel free to leave comments or other decorating ideas. Happy Cooking!

Monday, March 1, 2010

New Dishes in Pretty Polka Dot!

This is going to be my future set of dishes!  I'm so in love with these. Now I can't wait to get into my new kitchen and start using them!
Happy Cooking! I know I will be with these! Check out Celebratinghome.com to find more.

Wednesday, February 17, 2010

Little Italy

This is so simple and an easy weeknight dinner. Chicken Manicotti has been reinvented!

Ingredients:

  • Chicken breasts
  • Manicotti noodles
  • Favorite spaghetti sauce
  • Mozzarella cheese, shredded
Pour a layer of spaghetti sauce into the bottom of a 9x13 pan and preheat the oven to 350.Stuff sliced raw chicken breasts into the manicotti shells, careful to not break shells. Place the shells on top of spaghetti sauce and cover with another layer. Top with mozzarella cheese. Bake for 45-50 min and enjoy. If the cheese starts browning too much, you can cover with foil and finish baking.

Hope you enjoy and Happy Cooking!

Tuesday, February 16, 2010

Mexican for the College Student

I can't take credit for this one. Isaac came up with this recipe about a year ago and it is a favorite during Sunday night football.

Cook the onion until tender then add in your chopped chicken. Make sure the chicken is cooked all the way through. While the chicken is cooking, heat 3 UncleBen's Spanish style rice in the microwave. Once they are done, place in the bottom of a 9x13 pan. Top with chicken and onion. Add diced jalapeno or pablano peppers. (or both) Top with Tostino Cheese Dip and Mexican blend cheese and bake for 30 min on 350.

No picture today but I have to assure you it is wonderful to eat. Try your own combinations of flavors. Happy Cooking!

Monday, February 15, 2010

BBQ Sauce from Heaven!

This is one of my favorite things ever! It is great on chicken, ribs, pork, and anything else you can think of!

It's so simple too. Equal parts Vinegar, Brown Sugar, and Ketchup. Add a dash of yellow Mustard and some Red Pepper flakes. Thats it! Heat on stove so the brown sugar is melted. The long it sits the spicier it will get.

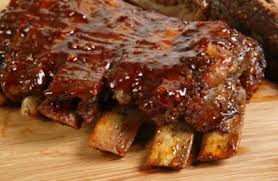
For the ribs, cook at a low temp, 250-275 for 3-4 hours until tender. Mix up the BQ sauce and put on the grill to heat back up and put on the sauce. Fall of the bone ribs!

Check back for the BBQ Pulled Chicken recipe! It's coming soon.

Happy Cooking!

Wednesday, February 10, 2010

For the Junk Food Craving

I always want junk food after I have started a diet. Here is a super easy chicken nugget that it is healthy.

All you need is Oven Fry Chicken and chicken! Two ingredients. Start by preheating the oven to 350. While the oven is warming cut the chicken into bite size pieces and toss in Oven Fry. If the chicken has started drying, just run under water before tossing in Oven Fry. I use a stone to bake them on, but if you don't have one, just use any dish with a lip around it. Bake for about 20 minutes or until the nugget is white all the way through.

Hope you enjoy! Happy Cooking!

Tuesday, February 9, 2010

Blueberry Pineapple Dump Cake...Yum

Even though there is a short time that blueberries are in season in NC, I love this dessert all year long! There are a lot of variations to this recipe but this one is my favorite. Blueberry Pineapple :)

Use a 9x13 pan and put blueberries in the bottom, covering. Add a can of pineapple on top. Top with yellow cake mix and a stick of butter cut into small pieces. bake at 375 for 35-40 minutes.

Easy enough? I thought so! Go out and try your favorite fruit combinations. The options are limitless.

Happy Cooking!

P.S. this is a weight watchers recipe if you count points, each serving is 7 points.

Sunday, February 7, 2010

Chicken Parm

I had a roommate that tried to make chicken parm and the recipe was so hard and confusing. I wanted to find another way to fix the great meal and still be easy and quick. Well here it is.

Ingredients:
Chicken breasts
Oven Fry Chicken
Pasta sauce
Spagetti noodles
Mozzarella cheese
Parmesan cheese

Take as many chicken breasts as you need to feed everyone in your party. Coat these in Oven Fry Chicken and cook according to the box. While the chicken is in the oven, boil your water and cook the pasta. Once the chicken and pasta are done put the pasta in the bottom of a 9x13 pan with the chicken on top and cover with your favorite pasta sauce. Put cheese on top and cook at 350 until the cheese has melted.

Hope you enjoy this recipe and it's simplicity. Happy cooking!

Thursday, February 4, 2010

Light Pizza???

Today this is what I have wanted all day long, knowing that since I splurged on it this weekend it wasn't an option. I think pizza is one of the only things that I crave and that I could eat everyday. But now there is a lighter version thats not so bad.

Start by toasting the the Flat Out at 350 for 15 minutes. Once it is toasted, add pizza sauce and 16 pepperonis and cover with cheese. Then put back in the oven until cheese is melted. I can't remember how many points this is in Weight Watchers but it is a small number and great for lunch or dinner.

If you don't want or have time to toast the Flat Out, I like rolling it up like a wrap. Could be a little messy with the sauce.

Flat Outs are normally found in the deli section of most major grocery stores.

Try your own topping combinations and I hope you enjoy as much as I have! Happy Cooking!

Wednesday, February 3, 2010

Need Dinner Quick?

I love easy, quick recipes. This is also a favorite of most people I make it for. It could be just as big a hit for you as it for me.

To make this even faster you can boil the chicken the night before and have it cooled in the refrigerator or use a rotisseries. So here is it. My friend who introduced the recipe to me has coined this Chicken Ring and it has stuck with my friends and family as well.

Ingredients:

  • 4 chicken breasts, boiled and shredded
  • 1/2 c Mayonaise
  • Swiss Cheese, shredded
  • Dijon Mustard
  • Bacon Bits
  • Parsley
  • 2 cans Crescent rolls
Start by mixing chicken with mayo to make it stick together then about 1Tbsp of Dijon Mustard. Add in bacon bits to taste as well as Swiss Cheese. (I have tried this with other cheeses and it just isn't as good, but feel free to try new combinations) Add parsley for color. 

This part works better on a stone pizza dish, but if you don't have one of these any round flat dish will work. Next roll out crescent rolls into a sun design adding filling into each large end of the crescent roll.


Finish by rolling the narrow end on top of the filling and baking for 12- 15 on 350.

Hope you enjoy as much as I do!  Happy cooking!

Tuesday, February 2, 2010

A Sweet Treat for Your Valentine

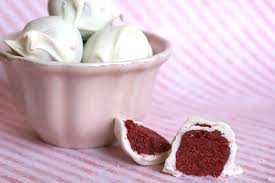
I'm trying to get a head start on the recipes for Valentine's Day. Here is one of my favorite little bite size desserts. These little balls are very versatile, my favorite are Red Velvet Cake and Oreo.

Use you favorite box cake mix and bake the cake according to the box. Once the cake is cooled crumble the cake and add in your favorite icing.

For Red Velvet I recommend Cream Cheese Frosting. Once that is combined, roll mixture into small balls and freeze.

While the balls are in the freezer melt Almond Bark or other white chocolate baking chocolate. I use white chocolate for both Red Velvet and oreo.

For the Oreo balls, crush the oreos in a bag. For this one you will need 8 oz of Cream cheese. Once the cookies are crushed, add the cream cheese, mix and roll these into balls and freeze. Once in the freezer melt your Almond bark and dip the balls and set aside to let them harden.

These are a wonderful treat for any occasion! Isaac took these this past Christmas as gifts for my family. They were a bigger hit than any of the other gifts! Try these out and use your favorite cake.

Other suggestions are Funfetti or German Chocolate. Happy cooking!

Monday, February 1, 2010

Breakfast in Bed Anyone?

My family has coined this recipe as the Breakfast Casserole. There are many forms of this wonderful casserole, and I might be biased but ours is the best. Feel free to try and out and tell me what you think.

This is a favorite of many people that I have shared it with. Isaac asked for this about every other time I see him.

This is a super simple recipe that is hard to mess up for those new to cooking.

Ingredients:

2 eggs, beaten
1lb sausage
2 cans crescent rolls
2 c shredded sharp cheddar cheese.

Preheat oven according to crescent roll directions. Start by browning your sausage, this could be done the night before if you are pressed for time in the morning. In a large bowl mix together your beaten eggs, sausage and cheddar cheese. Roll out one can of crescent rolls into the bottom of a 9x13 baking dish. (I find glass or stoneware works better than metal) Add you sausage mixture and top with the second can of crescent rolls. Bake 15-20 minutes or until top is golden brown. If the top looks like it is getting too brown and the bottom needs more time, you can cover with aluminum foil.

I hope you enjoy this as much as me and mine. Happy cooking!

My New Favorite Toy

I found these at Williams-Sonoma and I have fallen in love! They could be used for so many occasions, and believe me I plan to use them too!

First on the list, special Valentine's Day cookies personalized just for me!

Happy cooking!

Perfect Pick for the Superbowl

This is one of my favorite football foods. It brings back memories of watching the football with my family and the neighbors from years ago.

Ingredients:


  • 1lb lean hamburger
  • 2lb Velveeta cheese, cubed
  • 1 jar of your favorite salsa
  • jalapenos to taste


Start by browning your hamburger and draining the grease off. Mix in salsa and cubed Velveeta cheese. This can be made on the stove or in a crock pot. (If in the crock pot, a liner is recommended.) Add jalapenos either diced or rings to taste. These can also be added in after for those who like it a little more spicy.

I know I can't wait to make this next weekend for our Superbowl party! Have fun and enjoy. Happy cooking!